A Minimal Introduction to Reproducible Research
2026-05-03
1 Overview
This is a minimal introduction to reproducible research, including data management and handling data in R, compiled for the Biological Sciences BSc(Honours) class at the University of Cape Town.
This is a living document, and I will be updating it as we go along. It is written in R Markdown and compiled using bookdown. The source code for this document is available on GitHub and is licensed under a Creative Commons Attribution 4.0 International License. You are free to use and adapt the material as you see fit, but please provide attribution to the original author.
1.1 General
This really is a minimalist introduction. We only have a week! I’ll focus on providing a broad overview of the general framework and motivation for reproducible research (including good data management), teaching a few practical skills along the way.
Mostly this is not fun and exciting, but it is important stuff for any scientist to know. I’ll try my best to make it interesting! Hopefully by the end of the module you’ll see the value in it all - both for you as an individual and for science and society in general.
“Let us emphasize again this obvious conclusion: a scholar’s positive contribution is measured by the sum of the original data that [they] contribute… Hypotheses come and go but data remain. Theories desert us, while data defend us. They are our true resources, our real estate, and our best pedigree. In the eternal shifting of things, only they will save us from the ravages of time and from the forgetfulness or injustice of [people]. To risk everything on the success of one idea is to forget that every fifteen or twenty years theories are replaced or revised. So many apparently conclusive theories in physics, chemistry, geology, and biology have collapsed in the last few decades!” - Santiago Ramón y Cajal, 1906 Nobel Laureate, from Advice for a Young Investigator 1898 (Ramón y Cajal 1999)
i.e. ideas are cheap, data are priceless
1.2 Lectures/Discussions/Tutorials
These will be held live in person in BIO LT1 from 9:30 to 11:30AM from the 16th to the 20th February unless otherwise announced on Amathuba.
I’ll be adding to (and mostly teaching from) these online course notes as we go along.
The schedule of lectures (and readings) is as follows:
- Monday, 16th Feb - Reproducible Research (Baker 2016; Peng 2011; Markowetz 2015)
- Tuesday, 17th Feb - Data Management (Michener and Jones 2012)
- Wednesday, 18th Feb - GitHub, Tidy Data and Data Wrangling (Wickham 2014; Wickham et al. 2019)
- Thursday, 19th Feb - Tidy Data and Data Wrangling continued (your turn)
- Friday, 20th Feb - We can discuss if you need me available to help. Possibly online.
There will also be an online UCT Data Management Plan tutorial with Sanjin Muftic (UCT Libraries) on Tuesday the 17th Feb at 1PM. Please sign up for the tutorial. It will be instrumental in helping you complete the first deliverable for this module, which is a draft Data Management Plan (DMP) for your Honours Project (or mock project).
1.3 Deliverables (Due Thursday the 26th February)
A draft Data Management Plan (DMP) for your Honours Project (or mock project) using UCT’s Online DMP Tool. Please use the “UCT Student Generic - Full DMP” template. This is a draft, so don’t worry too much about getting it perfect, but do try to think about what data you’ll be collecting, how you’ll store it, how you’ll back it up, and how you’ll share it. You’ll need to submit a link to the DMP with your Honour’s project, so it’s worth getting a head start on this now.
A fully reproducible GitHub repository containing suitably named sub-folders, data files (if small) and the R scripts (that you’ll develop based on Wednesday’s tutorial), all in line with best practice as per the content of this module. It will also need have a Binder badge in the README that works and allows me to execute your code online (instructions below).
- Again, best if these are data related to your Honour’s project (speak to your supervisor), but it can be a different dataset or a mock dataset if you prefer (e.g. you could simulate the kind of data you expect to be working with for your project).
- More about the R script during the Tidy data tutorial, but it must be easily executable by Binder, and output your data in tidy format and a summary figure of some kind.
- Since it will be public, it is best to censor or obfuscate your data if they are not open access. If your data are large (>5MB), then it’s best to create and only upload a smaller subset of the data. Note that your R script must still work with the reduced dataset, since part of your mark will be based on whether your script runs and the output reproducible.
- To use Binder with R, you first have to add a
runtime.txtfile to your repository that specifies the version of R you want to use and aninstall.Rfile that specifies the R packages you want to install. You can find examples of these files at https://github.com/jslingsby/bogusrepo. Note that you’ll need to add any specific libraries you use in your R script to theinstall.Rfile. - The Binder badge can be created by going to Binder, pasting the URL of your GitHub repository into the “GitHub repository name or URL” box, and clicking “launch”. If it works, you’ll be taken to a page where you can interact with your repository online. Copy the URL of this page (under “Badges for your README” on the Binder landing page) and paste it into the README of your repository. This will create a badge that will take anyone who clicks on it to the Binder page where they can interact with your repository online. NOTE: Binder sometimes fails. I think this is because it’s a free service and gets overloaded. If it fails, try again later. If it fails repeatedly, try again later. If no luck before the submission deadline, let me know and submit the link to your repository without the Binder badge. It also sometimes freezes and looks like it’s running for ages (>15 minutes). In those cases it has usually worked and just not told you, so try the link.
- Please test your repository by clicking on the Binder badge in your README. If it works, you should be taken to a page where you can interact with your repository online. Click on the RStudio icon to open an RStudio session in your browser. You can then open and run your R script (or RMarkdown or Quarto file) from here. If it doesn’t work, your repo probably isn’t reproducible. Check the warning and troubleshoot…
- Lastly, I’d like you to spend some time reading up about reproducible research and data management (preferably relevant to our field) and to share any interesting resources you find - a link to a paper, news article, blog, tutorial, etc - with a 50 to 200 word summary of what it is and why its relevant and interesting. These need to be different to those already listed in the Further Reading below. You will share your contribution with me (and the world) by using GitHub to clone this repository, adding your content to the Further Reading section and sending me a pull request. You’ll see how to do this on Wednesday.
1.4 Software installation and setup (Due Monday 16th Feb)
For the data wrangling exercise and the second deliverable, we’ll be using the R statistical programming language and the Git version control system. We’ll also be using an integrated development environment (IDE) for each: RStudio and GitHub, respectively.
If you already have these installed and set up, please make sure you have the latest versions, and check that your installations are working! Please also make sure you have installed (and/or updated) the Tidyverse set of R packages. It can be installed using the code
install.packages("tidyverse")and updated usingupdate.packages("tidyverse").
The installation and setup can be a bit long-winded, but once done you should be good to go until you change or reformat your computer. The steps below are my summary and (hopefully) more intuitive adaptation of the instructions provided for setting up GitHub and version control with R. If my steps don’t work its probably best to read up there, or at Happy Git with R.
First we’ll start with the necessary software.
- Download and install the latest version of R
- Download and install the latest free version of RStudio Desktop
- Download and install the latest version of Git - accept all the defaults
- Create a GitHub account
- Run through the 10 minute GitHub tutorial that is offered when you activate your GitHub Account (It’ll really help you get the idea behind what Git does!)
Now you have RStudio, R and Git installed, and you have a working GitHub account that lets you do stuff online, but what remains is to get GitHub working locally and configuring RStudio to use GitHub. If any of the following doesn’t work, have a look at the installation section of Happy Git with R to troubleshoot:
- Install GitHub CLI (Command Line Interface).
- Open RStudio.
- Select the
Terminaltab (top left, next toConsole) - Enter
gh auth login, then follow the prompts:- Select
GitHub.com - When prompted for your preferred protocol for Git operations, select
HTTPS - When asked if you would like to authenticate to Git with your GitHub credentials, enter
Y - When asked how you would like to authenticate select
Login with web browser - Copy the 8-digit code and hit
Enter - Github.com will open in your internet browser - paste the code and hit enter
- If any of these steps don’t work, just start again with
gh auth loginin Terminal
- Select
Now that GitHub is starting to enforce 2-factor authentication, you may also need to do the following (especially if you get login issues at the end of step 10):
- We need to add a “personal access token” (PAT) which is generated by GitHub and added to R. We’ll manage this using
library(usethis)as it simplifies things. See this article for a full explanation.- First, install the package by running
install.packages("usethis")in the R console - Second, create a Github authentication token by running
usethis::create_github_token()in the R console- Follow the prompts. Give the token a sensible name like “personal-laptop-rstudio-git” so you can work out what it is if you need to later
- Copy the code displayed - You will not be able to see it again!
- Third, run
gitcreds::gitcreds_set()in the R console- When prompted, paste your token into R
- First, install the package by running
- In RStudio
- Go to
Global Options(from theToolsmenu) - Click
Git/SVN - Make sure
Enable version control interface for RStudio projectsis on - If necessary, enter the path for your Git or SVN executable where provided (this shouldn’t be needed, but may)
- Click
Apply - Restart RStudio
Ok, now everything should be working. If not, and you’ve tried repeating steps, have a look at the installation section of Happy Git with R to troubleshoot…
The next steps (explained below) are to fork and clone your first repo to see if everything is working, and then to modify a file in RStudio, push it back to your forked repo, and then create a pull request for me to review and accept your changes. This let’s me know that you’ve made it through the preparation for the practical, and it gives me your GitHub username.
- In GitHub:
- Make sure you are logged in, search and navigate to
https://github.com/PlantEcologi/BIO3019S_test - Click
Fork, which will make a copy of the repository to your own workspace - Copy the URL to your own version and follow the instructions below for cloning the repository in RStudio
- In RStudio:
- In the top-right of the window you’ll see
Project: (None)- click on it and selectNew ProjectthenVersion ControlthenGit - In the
Repository URl:box paste the URL to your forked repo (It should look something like :https://github.com/YourGitHubUsername/your-forked-repo_name.git) Project directory nameshould fill automatically- For
Create project as subdirectory of:hitBrowseand navigate through your file system to where you want to put your folder for storing your Git repositories. I recommend something high in your directory system like~Documents/GIT. Avoid putting it in a folder that syncs online like a OneDrive, GoogleDrive, iCloud or Dropbox folder. If you’ve used Git before you may have set this already and can skip this step. - Click
Create Repository
Your RStudio window should now look something like this:
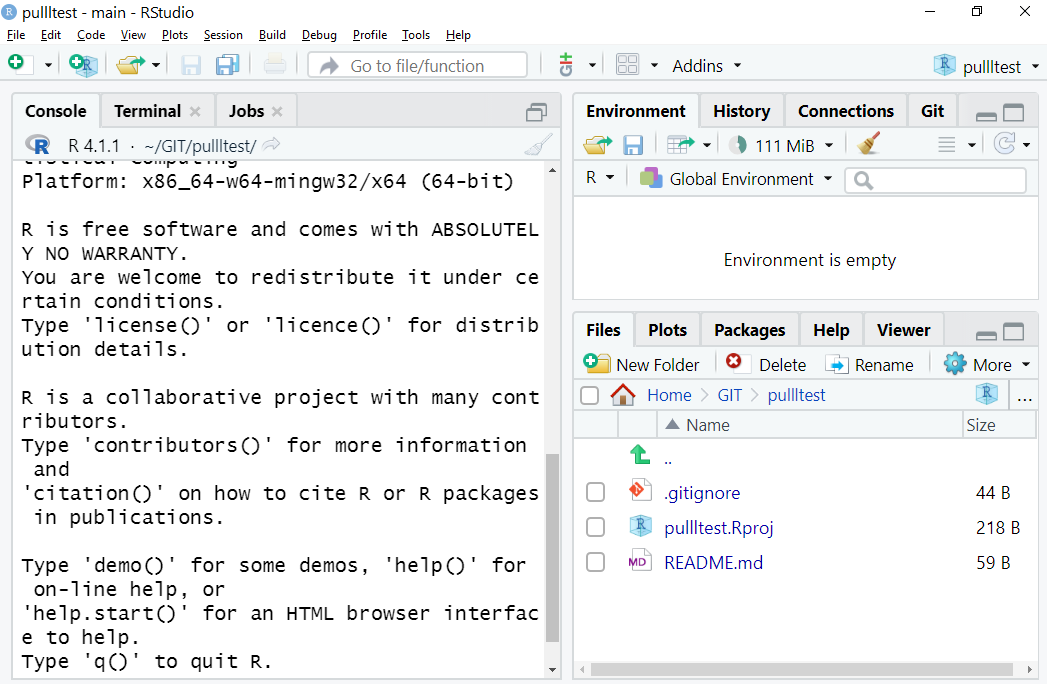
Figure 1.1: What you should see… Note there are three files in the Files tab in the bottom-right window, and you should see a Git tab for the top-right window. It also says pullltest in the project drop-down top-right on mine, but yours will display the name you gave your forked repo.
- Open the
README.mdfile in RStudio - Add your message (something like “Hi! This is Real Name and I’ve made it this far!!!”) and save the file
- Select the
Gittab in the top-right window - Check the box next to
README.mdand clickCommit - Add a
Commit messageto say what changes you’ve made - Then hit
Push - It may ask you to authenticate. Select
Authenticate in your web browser. The web browser will ask you to give Git permissions. Allow the permissions and it should work.
If you get an error at this point to the effect of “You do not have permission to push to this repository”, then you may have forgotten to fork your own repo from my one and are trying to push to mine… If so, start again from step 9.
If you encounter authentication issues, redo step 7.
- In GitHub (i.e. online)
- Click
Pull requests(top-leftish) - Click
New pull request(green, top-right) - Click
Create pull request(green, top-right)- It should already be on this repo unless you’ve been doing other things in Git
- In the comment window put your name so I know who you are if it isn’t obvious from your GitHub username
- Click
Create pull request(green, bottom-right)
- Lastly, you need to install the Tidyverse set of R packages. This can be done running the code
install.packages("tidyverse")in your console.
And you’re done!!! I’ll get a notification of your pull request and, if all’s in order, I’ll accept it. If not, I’ll reply with a comment on the pull request. You should receive a notification via the email you registered with your GitHub account.